Quick takeaway
Zotero is great for collecting and reading papers, but it’s harder to organize ideas across many papers. By exporting Zotero notes into Obsidian and building tag-based tables with Dataview, you can review literature as a structured knowledge base (timeline, themes, connections).
Bottom line (TL;DR)
- Import papers into Zotero (with PDFs)
- Annotate PDFs → generate a Zotero note
- Use Zotero Integration to create literature notes in Obsidian
- Use Dataview to show filtered notes as a table inside your review note
Table of contents
- What is Obsidian?
- Why connect Zotero + Obsidian?
- Key Zotero settings (notes/tags)
- Obsidian setup (folders/plugins)
- Zotero Integration settings (with template)
- Dataview table for literature review
Recommended minimum setup
- Zotero: Install Better BibTeX (for stable citekeys)
- Obsidian: Install Zotero Integration and Dataview community plugins
- Workflow: Import → auto-generate note → add a short “Synopsis” in Obsidian for table views
What is Obsidian?
Obsidian is a note-taking app based on Markdown. Unlike a simple Markdown editor, it’s designed to organize knowledge by linking notes together (links, backlinks, and a graph view).
Similar apps include Notion, Evernote, and GoodNotes, but Obsidian can store data locally. Since notes are plain Markdown files, you can open them with a regular text editor (or even a browser) without being locked into a specific app.
Organizing papers by connecting Zotero and Obsidian
I previously wrote about reference management with Zotero, but recently I started combining Zotero and Obsidian for literature reviews. The idea is: manage papers in Zotero, then export Zotero notes into Obsidian to build a searchable “literature database,” and organize insights across many papers.
Zotero is excellent for organizing papers one by one, but it’s harder to synthesize across multiple papers. Obsidian complements that by making it easy to connect notes and build structured summaries.
Workflow overview (Zotero → Obsidian)

-
In Zotero
- Import PDFs from websites.
- Annotate PDFs.
- Create a literature note.
- Add tags.
-
In Obsidian
- Import Zotero notes and metadata to generate literature notes.
- Edit notes if needed (e.g., add a 2–3 line summary for table views).
- Filter notes and display them as a table.
The screenshot shows a table built from literature notes filtered by tags such as “ProstateCancer”, “MRI”, “DL”, and “WeaklySupervisedLearning,” sorted by publication year/month. This makes it much easier to understand the research timeline and relationships between papers.
Because the table is embedded inside a Markdown note, you can write your own discussion before/after it. Each row links to the corresponding literature note, so you can jump directly to a paper note. You can also customize the table columns freely—for example, “Synopsis” and “Rating” can reflect fields you added to your notes.
Important Zotero setup
For Zotero download/setup/plugins and how to export annotations into notes, please refer to this article . Note that you’ll need the Better BibTeX plugin on the Zotero side.
Here I only highlight the settings that are especially important for exporting and saving notes.
Remove quotation marks when saving notes
Saved notes are wrapped in quotation marks (“ ”) for each highlight block. You can disable this as follows:
Preference/Advanced/Config Editor
Search for: extensions.zotero.annotations.noteTemplates.highlight
Please add the bold part like this in the editor:
<p>{{highlight quotes='false'}} {{citation}} {{comment}}</p>
Zotero also adds annotation citations (e.g., “Cai et al 2022 p2”) by default. You can hide them by clicking “…” at the top-right of the note and selecting “hide annotation citation”.
Tag formatting
Zotero allows spaces inside tags, but Obsidian does not. Replace spaces with “_” or use CamelCase (e.g., use Prostate_Cancer or ProstateCancer instead of “Prostate Cancer”). Editing tags from the tag list (bottom-left in Zotero) is convenient because it applies across all items.
Download Obsidian
Obsidian can be downloaded from the official website .
My environment and versions
My setup:
- Mac: Sequoia 15.2, Obsidian: 1.8, Zotero: 7.0
- Windows: Windows 10, Obsidian: 1.8, Zotero: 7.0
Create a vault and prepare folders like this:
Vault
  ├── Project 1
  ├── Literature
  │         └── Inbox       (literature notes are saved here)
  ├── Templates            (store templates here)
  │         └── Scripts     (optional scripts for attaching images)
  └── Attachments          (images are saved here)
Obsidian settings and plugin installation
Open Settings (gear icon at the bottom-left). In the Community Plugins tab, disable Restricted Mode so you can use community plugins.
Search and install plugins via Community Plugins → Browse. The key plugins for Zotero integration and literature organization are:
- Zotero Integration
- Dataview
After installing plugins, they appear in the left settings panel. Click the gear icon for each plugin to configure it.
Zotero Integration settings
My Zotero Integration settings:
Import Format
Name                       (used in the command palette; any name is fine)
  Import note from zotero
Output Path                (where notes are saved + naming format)
  Literature/Inbox/{{date | format("YYYY-MM")}} {{creators[0].lastName}} {{creators[0].firstName[0]}}.md
Image Output Path          (where images are saved)
  Attachments/{{date | format("YYYY-MM")}} {{creators[0].lastName}} {{creators[0].firstName[0]}}/
Template                   (template file)
  Templates/Zotero_Template.md
This is the template. Copy it as
Zotero_Template.md
and save it under the Templates folder.
---
category: literaturenote
tags:
{% for t in allTags.split(",") -%}
  - {{ t | trim | replace('#','') }}
{% endfor -%}
citekey: {{citekey}}
rating:
---
*{{publicationTitle}}*
{{title}}
# Summary

> [!My note]
> Synopsis::
# Methods

# Results
{% set annots = annotations %}
{%- for annot in annots -%}
{% if annot.type == "image" %} ![[{{annot.imageRelativePath}}]]
{% endif %}{% endfor %}

## PDF
{%- for attachment in attachments | filterby("path", "endswith", ".pdf") %}
[{{attachment.title}}](file://{{attachment.path | replace(" ", "%20")}}) {%- endfor -%}.
## Abstract
{%- if abstractNote %}
{{abstractNote}}
{%- endif -%}.
## Metadata
{% for type, creators in creators | groupby("creatorType") -%}
{%- for creator in creators -%}
**{{"First" if loop.first}}{{type | capitalize}}**::
{%- if creator.name %} {{creator.name}}
{%- else %} {{creator.lastName}}, {{creator.firstName}}
{%- endif %}
{% endfor %}
{%- endfor %}
**Title**:: {{title}}
**Year**:: {{date | format("YYYY-MM")}}
**Citekey**:: {{citekey}} {%- if itemType %}
**itemType**:: {{itemType}}{%- endif %}{%- if itemType == "journalArticle" %}
**Journal**:: *{{publicationTitle}}* {%- endif %}{%- if volume %}
**Volume**:: {{volume}} {%- endif %}{%- if issue %}
**Issue**:: {{issue}} {%- endif %}{%- if itemType == "bookSection" %}
**Book**:: {{publicationTitle}} {%- endif %}{%- if publisher %}
**Publisher**:: {{publisher}} {%- endif %}{%- if place %}
**Location**:: {{place}} {%- endif %}{%- if pages %}
**Pages**:: {{pages}} {%- endif %}{%- if DOI %}
**DOI**:: {{DOI}} {%- endif %}{%- if ISBN %}
**ISBN**:: {{ISBN}} {%- endif %}{%- if desktopURI %}
**DesktopURI**:: [zotero-link]({{desktopURI}}){%- endif %}

> **Related**:: {% for relation in relations | selectattr("citekey") %} [[@{{relation.citekey}}]]{% if not loop.last %}, {% endif%} {% endfor %}

> {%- if markdownNotes %}
> {{markdownNotes}}{%- endif -%}.
Dataview
No special setup is required—just install and use it.
How to use Zotero Integration
Before importing into Obsidian, create a Zotero note from annotations. For testing, it’s also useful to include at least one image annotation and a few tags in Zotero.
To import notes into Obsidian:
- Open the command palette (Command/Control-P), type “zotero integration”, and select “Import note from zotero”.
- Search by author name (etc.) in the Zotero selection window and choose the paper.
Confirm that the generated note is saved under
Literature/Inbox
.
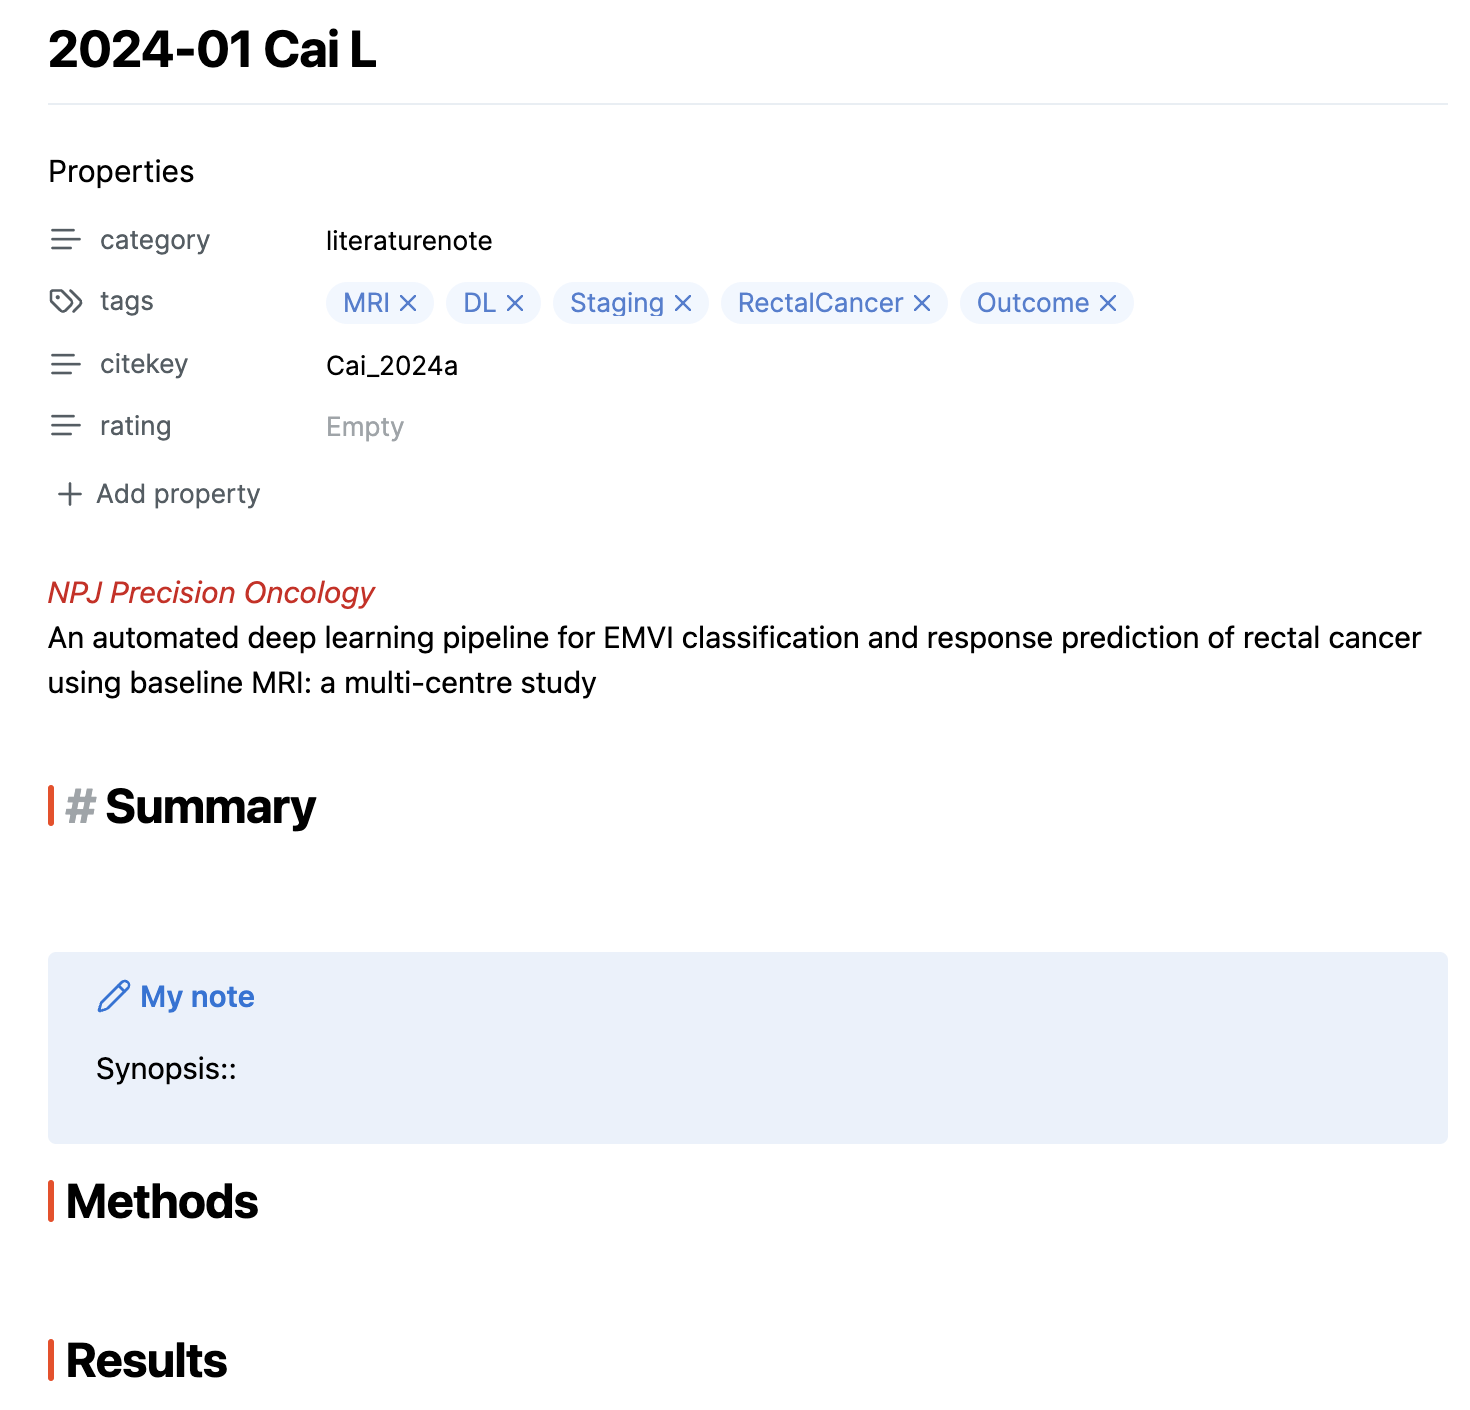
The top of the note (frontmatter) stores metadata such as tags. Confirm that tags are imported from Zotero. I also use “rating” as a simple importance score.
Below that, you’ll see the journal name and title, then sections like Summary/Synopsis/Methods/Results. In my workflow, I keep Zotero’s raw imported notes at the bottom (often messy) and copy/edit key parts into the Summary/Methods/Results sections. “Synopsis” is a short 2–3 line summary that I display in Dataview tables.
Images from Zotero annotations are attached under Results and saved into a matching folder under Attachments.

The metadata section includes Desktop URI (zotero-link), which points to the local Zotero item. I usually open PDFs via Zotero (using this link) rather than the direct file link.
Notes imported from Zotero are initially saved into
Literature/Inbox
. I use Inbox because I sometimes re-import the same paper after adding more annotations or images in Zotero. Keeping an Inbox avoids overwriting “cleaned up” notes elsewhere.
With the current naming scheme (YYYY-MM + author), filename collisions can happen rarely. Moving notes manually out of Inbox helps avoid accidental replacements. To reduce collisions further, consider including the citekey in the filename since citekeys are designed to be unique.
How to use Dataview
Create a new Markdown note (e.g.,
Project 1/literature_review_prostateMR.md
) and paste:
```dataview
TABLE
title as Title,
FirstAuthor as Author,
Journal,
Synopsis,
rating as Rating
From "Literature"
AND #tag1
AND #tag2
SORT file.name ASC
```
Replace “tag1” and “tag2” with tags you want to filter by.
Dataview basics:
- TABLE: show as a table (LIST is also possible)
- title, FirstAuthor, etc. are fields/variables shown as columns
- From sets folder/tag filters; AND/OR and parentheses can be used
-
You can also filter by frontmatter, e.g.,
WHERE contains(rating, "3") -
SORT file.name ASC: sort by filename
Conclusion
I recently started using Zotero + Obsidian together for literature organization. Obsidian is especially helpful for synthesizing insights across multiple papers—something that feels harder to do in Zotero alone. If you’re doing a literature review, it’s worth trying.
This is in English, but I found it helpful: this article .
I used to attach images via my own user script, but right before publishing I found a simpler method on Reddit and was honestly shocked. Still, I’ll keep my script as a reference: link . If you ever need to write a custom user script, this may help.
Last updated: September 18, 2025